How to Set Up Contact Form 7
Today we’ll show you how to set up Contact Form 7, one of the most necessary WordPress plugins.
Contenido
About Contact Form 7

Contact Form 7 is a completely free plugin for WordPress, whose function is the quick and easy creation of contact forms. It was created by Takayuki Miyoshi, and currently has more than 5 million active installations. It is also translated into 45 languages.
As a complement to Contact form 7, I recommend always installing Flamingo, a plugin made by the same creator and gives us more peace of mind.

Flamingo is a plugin that does not need set up after installation and subsequent activation. After activating the plugin, it will store a copy of each message sent through the contact forms of our WordPress.
How to Set Up Contact Form 7

Contact Form 7 is a plugin that is inside the repository of WordPress.org, from there we can search and install it in our WordPress. The installation of this plugin is very simple, just go to:
plugins > Add new > Search for «Contact Form 7» > Install > Activate
Or we can also download it from the repository and upload the .zip.
After installing
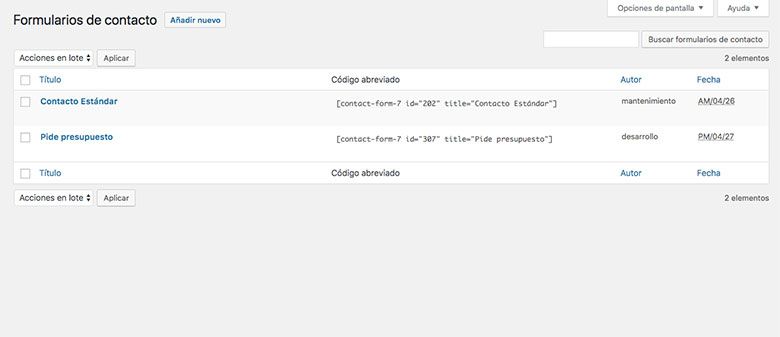
When we install Contact Form 7, a new section will be created in our WordPress administrator called «Contact». In this panel we will be able to view and manage all the forms we have created.
Creating a new contact form
To add a new form, click on «Add New» and we will see the following screen, is the form configurator.
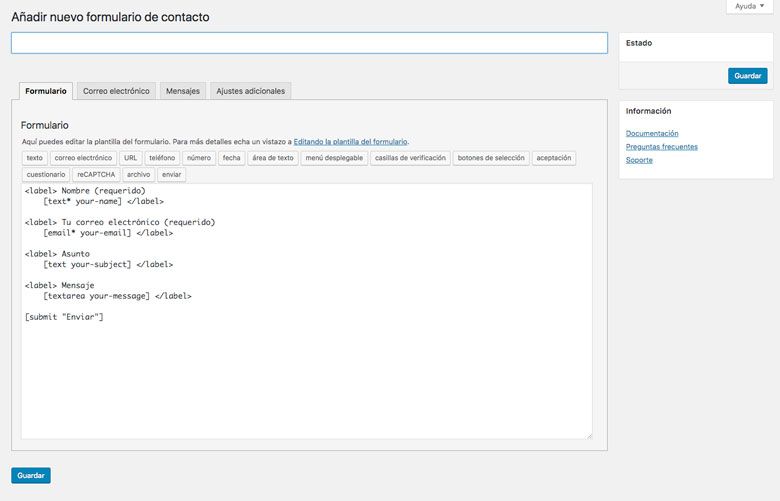
Contact Form 7 has a basic form to start with, although if we want to adjust to the GDPR we will have to add a checkbox and a text.
Contact Form 7 has four tabs:
- Form
- E-mail address
- Messages
- Additional Adjustments
Form
In this section we will be able to create the form itself. With the buttons of the different settings, we will be able to add the options that we need to our form.
How to add a field to my form
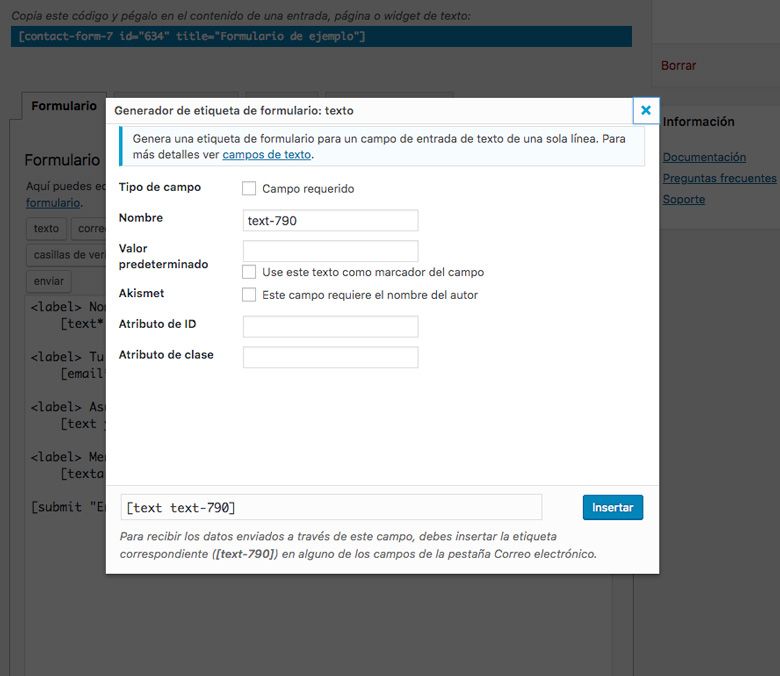
All the fields generated by Contact Form 7 open a pop-up similar to the one I show in the image. To add a field to the form, we must fill in the boxes we need.
- Field type: We mark if we want this field to be obligatory.
- Name: It will be the name of the field, this will not be seen by the end user, it is an internal value.
- Default value: It will be the default value that the field has. If we mark the box «Use this field as a field marker», we will be using it as placeholder of the field.
- Akismet: It works only if we have the Akismet plugin installed, if we have it installed and we mark it, it will decide if it is spam or not. If it is not spam it will send the mail, but if it is spam it will not send it.
- ID attribute: Give ID attribute to the field (normally used for CSS).
- Class attribute: Give class attribute to the field (normally used for CSS).
Most of the fields we add will share these types to fill in, some will have more and some will have less.
Email address
Here we will be able to configure everything related to the e-mail that you receive, besides all the other configurations.
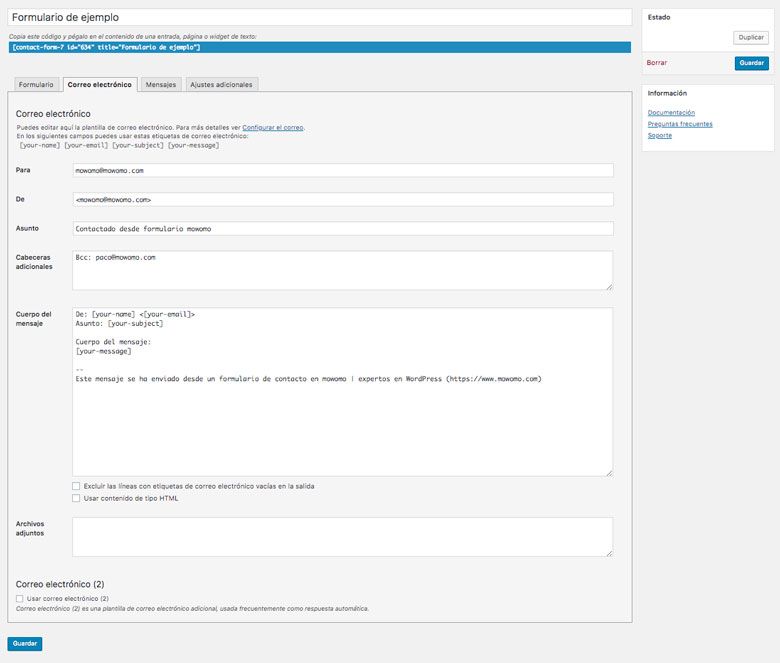
Each field
- To: Recipient email to which all emails sent from the form will be sent.
- From: Sending e-mail. (WARNING: it must be from the same domain as the web where the CF7 is installed).
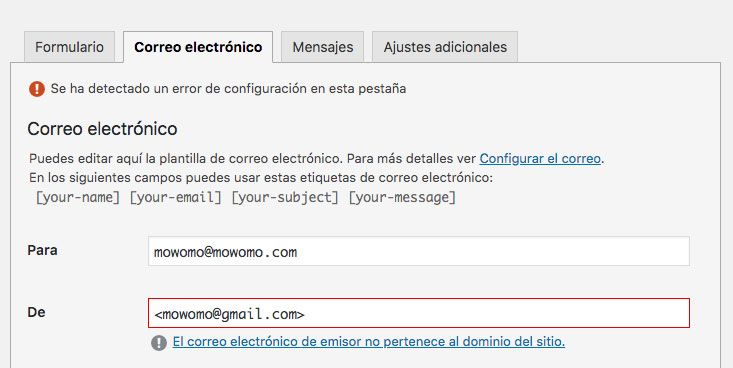
- Subject: Of the mail that reaches us.
- Additional headers: In this section we can add copies, hidden copies or other header configurations.
- Body of the message: Here we configure how the body of the mail that comes to us will look like. In the upper part it will tell us all the shortcodes that we can use in any field of this section.

The above terms can be found as: [your-name], [your-email], [your-subject] and [your-message]. The more fields I add in the «Form» section, the more shortcodes I will have for each field.
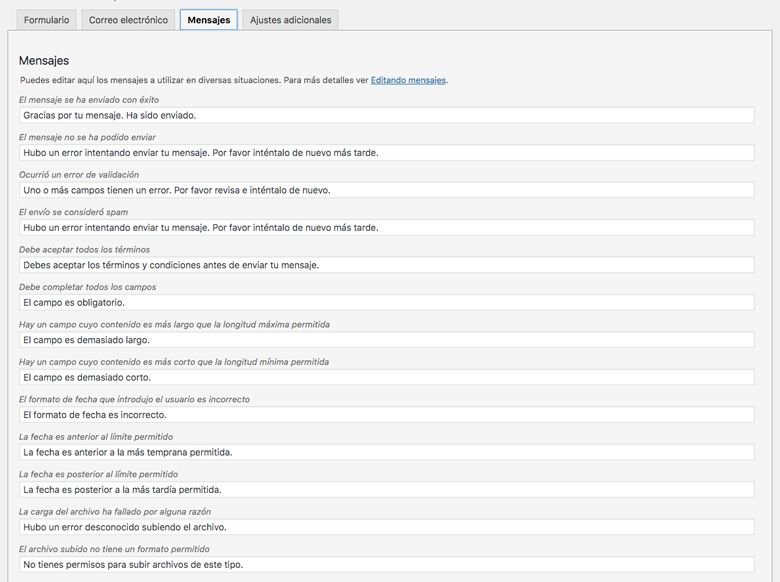
Messages
In this section, we can configure all the default messages that Contact Form 7 brings.
Additional adjustments
In additional settings we can add additional custom codes that we need, as well as additional settings that we will access through the link (copying and pasting the code in the «Additional Settings» text area).

Plugins for Contact Form 7
Contact Form 7 is a very simple but very powerful plugin. The community has developed a lot about it, creating a lot of plugins to increase its functionality. Among them we find:
- Contact Form 7 – PayPal & Stripe Add-on
- Google Analytics – Contact Form 7
- Contact Form 7 Redirection
- Contact Form 7 Mailchimp Extension
I hope you liked it and have learned how to Set Up Contact Form 7. If you have any questions, do not hesitate to contact us 🙂
¡Suscríbete a nuestra newsletter y recibe nuestras ofertas, novedades y descuentos directamente en tu email!


